In the previous posts, part 1 and part 2, for this blog series we created an environment where we can test directory enumeration tools and adjust rate limiting. Let’s continue to build out this testing environment by adding Cross-Site Scripting to our web testing environment. To do this we will use Golang and build a simple Hello World API with a web template to reflect our payloads.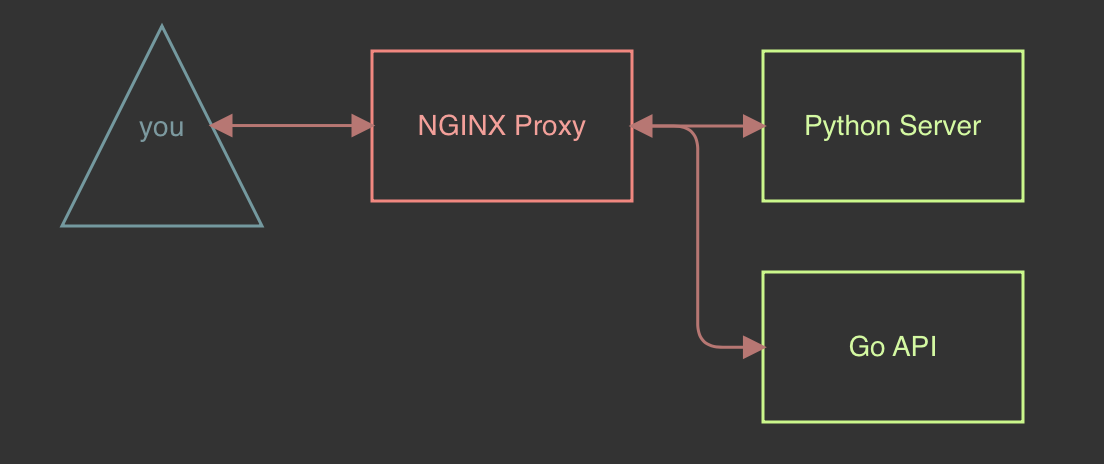
Building A Web Application
To build this vulnerable application, I will be using Golang 1.16 and create a file called web.go using the below base source code:
web.go
package main

import (
  "log"
  "net/http"
)

// main function
func main() {
    http.HandleFunc("/", HomePage)
    log.Fatal(http.ListenAndServe(":8080", nil))
}

// homepage
func HomePage(w http.ResponseWriter, r *http.Request){
    log.Println("I work!")
}
To verify that this works, we can run the command go run web.go and then by navigating to http://localhost:8080. We should see a log with the words “I work!”.

Adding A URL Parameter To Our API
For this step we will start by updating the HomePage function to build out an API to reflect our input. To accomplish this, we will set our function to look for a name parameter using r.URL.Query(). This will then be printed back to the terminal to verify that it is working as expected.
// Returns Default page
func HomePage(w http.ResponseWriter, r *http.Request){
    name := ""
    names, ok := r.URL.Query()["name"]

    if !ok || len(names[0]) < 1 {
        name = "Tester"
    } else {
        name = names[0]
    }
    log.Println("Name Param Value: " + string(name))
}
After substituting our HomePage, we restart the server using go run. We should now be able to use the following URL to send data to pass the API arbitrary values:
http://localhost:8080/?name=test
Templates & Cross-Site Scripting
Now that we have an API, all that is left is to build out a quick template to reflect the output. We will set up a directory structure like the one below to hold our html templates, along with a homepage.html file to hold our template html file.
Directory:
go-api
├── web.go
└── templates
    └── homepage.html
Below is a simplified template based on the documentation found within Build Web Applications with Golang and includes a variable to hold a Name parameter to reflect our API inputs.
homepage.html
<!DOCTYPE html>
<html>
<head>
    <title>XSS Testing</title>
</head>

<body>
    <p>Hello {{.Name}}!</p>
</body>
</html>
All that is left now is to make a few more changes to our go file to use our template. For this the first change that will need to be made is declaring one more import:
"html/template"Since this is a template, we will also need to create a structure to define our variable. One thing to note is that for our cases we will declare the Name variable as template.HTML that way when the content reflects on the page and render it. Something to keep in mind is if we are trying to do this in a way that will not render, we can always switch that declaration to a `String` which will not render. Although for our case we will use the below so that we can have an application vulnerable to cross site scripting using the code below and placing it right after the imports.
// template parameters
type PageVariables struct {
    Name         template.HTML
}
The next line we will add is to implement our template and assign the value we pass to the application into our template. To do that we can add the lines below to the end of our main function:
HomePageVars := PageVariables {
  Name: template.HTML(name),
}

t, err := template.ParseFiles("templates/homepage.html")
if err != nil {
  log.Print("template parsing error: ", err)
}

err = t.Execute(w, HomePageVars)
if err != nil {
  log.Print("template executing error: ", err)
}
This will leave us with a web.go file that looks like the below code:
package main
import (
"html/template"
"log"
"net/http"
)
// template parameters
type PageVariables struct {
Name template.HTML
}
// main function
func main() {
http.HandleFunc("/", HomePage)
log.Fatal(http.ListenAndServe(":8080", nil))
}
// Returns Default page
func HomePage(w http.ResponseWriter, r *http.Request){
name := ""
names, ok := r.URL.Query()["name"]
if !ok || len(names[0]) < 1 {
name = "Tester"
} else {
name = names[0]
}
log.Println("Name Param Value: " + string(name))
HomePageVars := PageVariables {
Name: template.HTML(name),
}
t, err := template.ParseFiles("templates/homepage.html")
if err != nil {
log.Print("template parsing error: ", err)
}
err = t.Execute(w, HomePageVars)
if err != nil {
log.Print("template executing error: ", err)
}
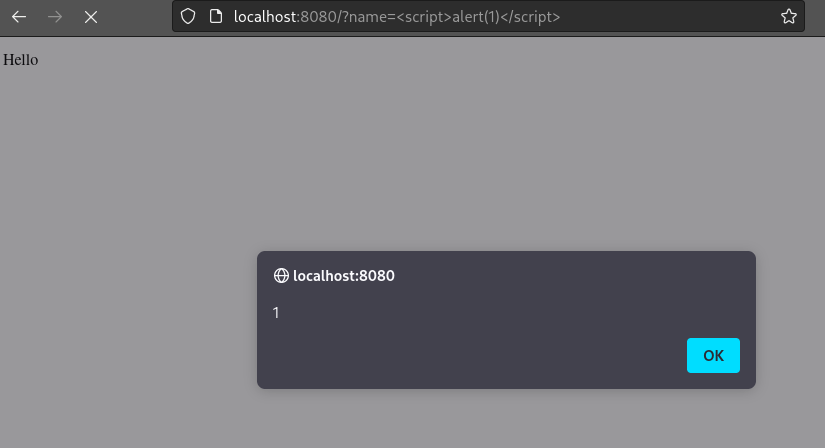
}After starting the server again, we should now see our values reflected and if we send a cross site scripting payload, we will see it execute in the browser:
Sample URL:
http://localhost:8080/?name=<script>alert(1)</script>
Starting the go webserver:
Alert box executing in the browser:
Adding In Restrictions
Since we have declared the Name parameter as template.HTML, it ensures that whatever HTML passed to the application will render. Let’s make one more change to the go web server and add in some filters for our input to go through to make it a little bit harder. To do this we will use some string replacement by adding a few additional lines and adding strings to our imports. The first target will be the word “script”. The below line will be added below the print statement logging our name parameter to our web server.
log.Println("Name Param Value: " + string(name))
name = strings.ReplaceAll(strings.ToLower(name), "script", "nope")
log.Println("Updated Name Param Value: " + string(name))
This will make it so that any time the word “script” is used regardless of letter case, it will result in the word “nope”. We can see this by inspecting the HTML or by looking at our web server showing us our updated text:
Name Param Value: <script>alert(1)</script>
Updated Name Param Value: <nope>alert(1)</nope>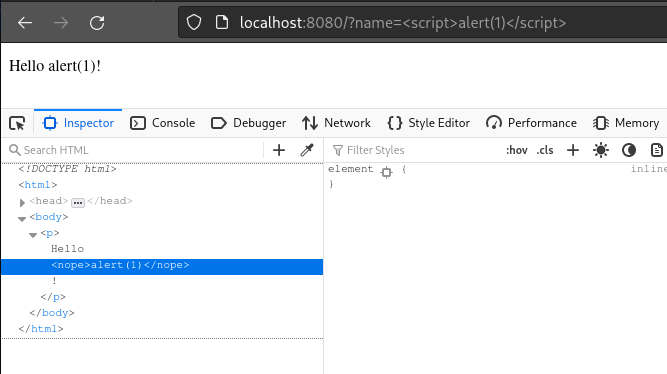
This still leaves a lot of options for cross-site scripting, so let’s add in a few other filters to remove quotes.
log.Println("Name Param Value: " + string(name))
name = strings.ReplaceAll(strings.ToLower(name), "script", "nope")
name = strings.ReplaceAll(strings.ToLower(name), "\"", "")
name = strings.ReplaceAll(strings.ToLower(name), "'", "")
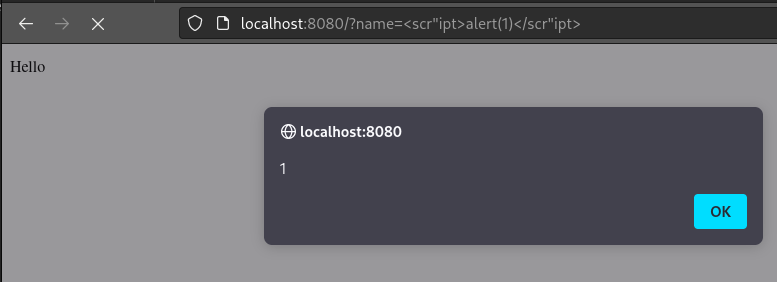
log.Println("Updated Name Param Value: " + string(name))With those changes, it can make our previous payload a little more interesting if we use quotes in our payload and use some of those filters to get our original payload to generate a working cross-site scripting payload. First, let’s try running the payload: <script>alert(‘XSS’)</script>
Name Param Value: <script>alert('XSS')</script>
Updated Name Param Value: <nope>alert(xss)</nope>
The above output tells us a lot about the rules in place even though we wrote those filters, we now have evidence showing that the word “script” is being swapped with the word “nope”, the case is being converted to lowercase, and quotes are possibly being stripped out. Knowing those filters, we can also use them to bypass those same filters that are preventing our payload. We just must use the quotes.
Name Param Value: <scr"ipt>alert('XSS')</scr"ipt>
Updated Name Param Value: <script>alert(xss)</script>
And now we have a payload that leverages our filters to get cross-site scripting, and the best part is we can add and remove filters depending on what type of payloads we want to test.
The fun part is that there is always a way around a set of rules and understanding what rules are being applied could be the difference between a successful payload and a failed payload. As shown from the cheat sheet provided by Portswigger, we can find many cross-site scripting payloads meant for a wide range of different scenarios. Since we have written our own filters, this can provide a good means of practicing both cross-site scripting and understanding what filters can break these payloads.
Dockerizing What We Have Built
Now that we have a configurable cross-site scripting environment it is now time to build it into the docker environment that we have been building throughout the past few blog posts. Much like the previous exercise, this can mean we will need to create a docker container to hold our application and configure our Nginx proxy to point to our new application. First, let’s start by setting up our directory, we should have something that looks like the below for the entire project.
web-test
├── docker-compose.yml
├── go-api
│   ├── Dockerfile
│   └── src
│       ├── go.mod
│       ├── templates
│       │   └── homepage.html
│       └── web.go
├── nginx
│   ├── cache
│   ├── cert
│   │   ├── cert.pem
│   │   └── key.pem
│   ├── error.log
│   └── nginx.conf
├── python-web
│   ├── Dockerfile
│   └── html
│       ├── admin-blog.html
│       ├── admin-xlogin.html
│       ├── hidd3n1
│       │   └── flag.txt
│       ├── img
│       ├── index.html
│       ├── js
│       └── robots.txt
We will begin by creating a Dockerfile for our application, lucky for us we can base our application off a template in Docker’s Documentation pages. Additionally, we will use the go.mod file since it is a dependency for creating a go binary as mentioned within Docker’s documentation. Another piece we will be adding is to place the templates folder we used for our application in the same directory as the compiled go binary so that way it can be referenced by the binary when it executes.
go.mod
module web.go

go 1.16
Dockerfile
FROM golang:1.16-alpine

WORKDIR /app

COPY src/web.go ./web.go
COPY src/go.mod ./go.mod
COPY src/templates ./templates

RUN go mod download
RUN go build -o /app/go-api

EXPOSE 8080

CMD [ "/app/go-api" ]
The next update that needs to be made will be to update the docker-compose.yml file to include our go API. This will look very similar to what was previously declared for the python webserver. Just below the python declaration, we will be adding the following to include the application as part of our webapps network.
go-api:
  build: ./go-api/
  restart: always
  networks:
    - webapps
After making that change all that will be left is to update our Nginx configuration file to create a path to our go API.
location /api {
  limit_req zone=ip burst=12 delay=8;
  proxy_pass          http://web-test_go-api_1:8080;
}
With that last update all that is left to do is rebuild the environment using docker-compose build followed by docker-compose up. Assuming all goes well when navigating to https://localhost/api?name=test we should be greeted with our hello world page we created.

End of Part 3

Within this blog we created a customizable cross-site scripting environment using Go and learned how to write custom filters to simulate rules to mitigate some cases of cross-site scripting. We even took it a step further by learning how to take advantage of how the rules are applied to create a successful payload. There is a lot more that can be added to this project, but the best part is that it is highly customizable to whatever scenario is desired and can easily be added to with the creation of another container. There are definitely a lot of prebuilt applications out there but sometimes it takes building something at least once to get a better grasp on a subject.
Again, here are the links to part 1 and part 2.
MORE FROM WHITE OAK SECURITY
White Oak Security is a highly skilled and knowledgeable cyber security testing company that works hard to get into the minds of opponents to help protect those we serve from malicious threats through expertise, integrity, and passion.
Read more from White Oak Security’s pentesting team.
Resources
https://gowebexamples.com/
https://gobyexample.com/http-servers
https://gobyexample.com/structs
https://golang.org/doc/articles/wiki/
https://pkg.go.dev/strings#example-ReplaceAll
https://www.geeksforgeeks.org/how-to-replace-characters-in-golang-string/
https://portswigger.net/web-security/cross-site-scripting/cheat-sheet