When seeing a new technique or tool, some of the first things that go through a pentester’s mind are “how do I test this?” and “how does this work?” More importantly – “how do I do this without getting a prison sentence?” Early in my security career, I found that the most common responses to this question is either “just build a test environment” or goes unanswered. Without knowing where to begin this can be challenging, possibly intimidating, and in some cases will end with the below statement:
“But I am not a programmer, I can’t build this…”
Neither am I, but like any skill, you will start to become one with more and more exposure. On the upside, the internet is a great place with a wealth of knowledge to learn and glean information. The tricky part is just connecting everything together and finding out what the correct question is to ask.
Like any project, the best approach is to break it into smaller, more manageable tasks. In this blog, we will be looking at building a web application testing environment for ourselves. So, let’s break this down:
- What should this be built in and can it be reverted after I break it?
- What vulnerabilities should be introduced to test against?
- Cipher Enumeration
- Directory Enumeration
- Cross Site Scripting
- What steps can be taken to remediate these issues?
Now that we know what we know what our goals are, we can now begin thinking about how this environment should look. Given how some applications are structured, that usually means a load balancer or proxy gateway with a series of applications sitting behind it preventing direct access. Let’s go with infrastructure that looks like the below:
Topology:
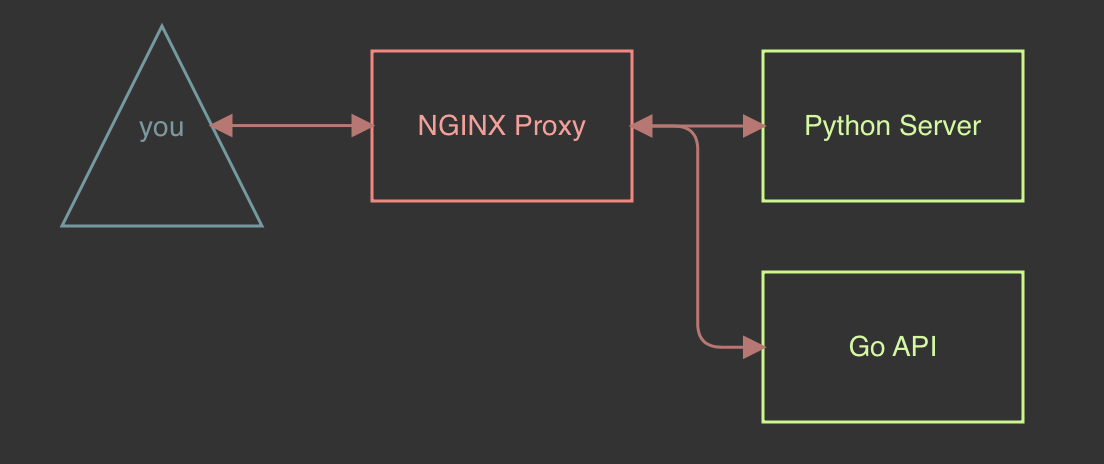
With an image of what we want this to look like, we are now ready to begin figuring out how to make this a reality. On the upside there are many ways of doing this, we could create virtual machines or we can create something more modular and use docker. Let’s start by answering the question “How do I begin?”
How Do I Begin & How Do I Setup This Docker Thing?
Since this will be using docker, all we will need is an installation of:
- docker-ce
- docker-compose
You can find instructions on how to install docker on Docker’s website. On the upside everything we need can be found via a search engine but like most new things, the hardest part is always figuring out what to ask.
If you are like me when I first installed this on Linux, the first issue you will run into is that docker requires sudo in order to run. After searching “running docker without sudo”, results such as this example (from askubuntu.com) will lead you to good results. The logged in user will be able to run docker without requiring sudo because it will be a member of the docker group and have permissions to use docker by running the following commands:
sudo groupadd docker
sudo gpasswd -a $USER docker
Run commands such as docker ps to verify that the docker service works. If it does not complain about privileges or other access issues, you should be good to start.
Docker Is Setup, Now What?
Now let’s create the directory structure for our environment to live in. Begin by making the below directory structure, don’t worry about content just yet, we will be filling those in as we progress through this blog. The only file at this point we will add content to is the docker-compose.yml which is also listed out below. This will give us a base to start building out our environment and create links to files in our directory.
Directory Structure:
 web-test/
 ├── docker-compose.yml
 └── nginx/
     ├── cache/
     ├── cert/
     ├── error.log
     └── nginx.conf
docker-compose.yml
version: '3'

services:
  nginx:
    image: nginx:latest
    restart: always
    volumes:
      - ./nginx/nginx.conf:/etc/nginx/nginx.conf
      - ./nginx/error.log:/etc/nginx/error_log.log
      - ./nginx/cache/:/etc/nginx/cache
      - ./nginx/cert:/cert
    ports:
      - 443:443
    networks:
      - webapps

networks:
  webapps:
    driver: bridge
Building the NGINX Proxy
Initial Setup
Now that those files are setup, we can start configuring our NGINX proxy starting with a self-signed certificate to encrypt our traffic. This can be done using openssl with the command below. This should generate a key.pem and the cert.pem file which can then be moved into nginx/cert/ so that we can reference it within our NGINX config file.
 openssl req -x509 -nodes -days 365 -newkey rsa -keyout key.pem -out cert.pem
 Generating a 2048 bit RSA private key
 ..........+++
 ................................+++
 writing new private key to 'key.pem'
 -----
 You are about to be asked to enter information that will be incorporated
 into your certificate request.
 What you are about to enter is what is called a Distinguished Name or a DN.
 There are quite a few fields but you can leave some blank
 For some fields there will be a default value,
 If you enter '.', the field will be left blank.
 -----
 Country Name (2 letter code) []:aa
 State or Province Name (full name) []:test
 Locality Name (eg, city) []:test
 Organization Name (eg, company) []:test
 Organizational Unit Name (eg, section) []:test
 Common Name (eg, fully qualified host name) []:test
 Email Address []:test
With our certificate in place, we can now move on to configuring the nginx.conf to make it use our certificate to encrypt our traffic and also setup a skeleton to point towards our applications.
nginx.conf
events {
}

http {
  error_log /etc/nginx/error_log.log warn;
  client_max_body_size 20m;

  proxy_cache_path /etc/nginx/cache keys_zone=one:500m max_size=1000m;

  server {
    listen 443 ssl;

    ssl_certificate      /cert/cert.pem;
    ssl_certificate_key  /cert/key.pem;
    ssl_session_timeout  5m;
  }
}
Our current directory structure should look similar to the example below. As we progress further with building up this environment, we will be adding to nginx.conf to point towards our other applications.
Current Directory Structure:
 web-test
 ├── docker-compose.yml
 └── nginx/
     ├── cache/
     ├── cert/
     │   ├── cert.pem
     │   └── key.pem
     ├── error.log
     └── nginx.conf
By using docker-compose we can then stand up our docker images and verify that everything is working as intended. The command for this will be docker-compose up from within our web-test directory. Assuming all goes well it should download an image of NGINX and start open port 443 and will give you a 404 not found message since we have not configured a web server for it to redirect to.
docker-compose output:

404 Page:

Enumerating Ciphers
At this point we can start taking a look at one of our initial goals – cipher enumeration. There are many ways of doing this, but my preferred means of doing this is using a tool called sslscan. Run sslscan https://127.0.0.1 to output a list of currently running ciphers. In my case, I get the below ciphers:

Let’s restrict the available ciphers down to just AES256 and TLSv1.2 by updating the nginx.conf file. See the config example below. More information on cipher and proxy configuration can be found at http://nginx.org/en/docs/http/ngx_http_ssl_module.html.
Update nginx.conf:
events {
}

http {
  error_log /etc/nginx/error_log.log warn;
  client_max_body_size 20m;

  proxy_cache_path /etc/nginx/cache keys_zone=one:500m max_size=1000m;

  server {
    listen 443 ssl;

    ssl_certificate      /cert/cert.pem;
    ssl_certificate_key  /cert/key.pem;
    ssl_session_timeout  5m;

    ssl_protocols  TLSv1.2
    ssl_ciphers  AES256:!ECDHE:!All;
    ssl_prefer_server_ciphers   on;
  }
}
Now that the config has been updated, we can now stop our docker instance by ending the application in the terminal by pressing Ctrl+C this will initiate a graceful shutdown of the containers. Once they have shutdown, we can then start it up again by using docker-compose up for our new configurations to take effect. After a fresh sslscan we will find that the initial list of ciphers have been reduced down to a select few allowed ciphers.

End Of Part 1
We now have a rudimentary web application environment where we can modify our allowed ciphers as needed. In the next part of this blog, we will continue to build up our Docker environment and setup a python web server to do directory and file enumeration. Hope you enjoyed this blog and see you in the next one!
MORE FROM WHITE OAK SECURITY
White Oak Security is a highly skilled and knowledgeable cyber security testing company that works hard to get into the minds of opponents to help protect those we serve from malicious threats through expertise, integrity, and passion.