This post will provide a primer on how to use Cypher queries within the Neo4j web console to investigate your BloodHound data and go beyond what the graphical user interface (GUI) can provide.
I encourage you to load up your own BloodHound data while going through this post and to use these examples to help become more comfortable with the Cypher query language.
BloodHound
BloodHound is a pentester’s best friend. The tool effortlessly collects a large amount of interesting information from Active Directory (users, groups, object properties, etc.) and from each domain-joined Windows computer (local administrators, active sessions, etc.).
The basic requirement to use Bloodhound is a set of credentials for a low-privileged domain account, but the higher the privileges – the higher the potential you have for collecting information from those domain-joined Windows computers.
The collected information will be stored in a Neo4j database and can be analyzed to find relationships between objects within a target’s Windows or possibly Mac environment.
Why Use the Console?
The typical way a pentester will use the BloodHound is through GUI, as described in Enhance, Enhance, Enhance…
The objective of using Bloodhound is to determine what targets of interest the pentester can access based on what the pentester has already compromised in the environment.
While the GUI is useful, it has limitations.
- The prebuilt queries are not extensive. For example, there is no prebuilt query for accounts based on a last name.
- Not all queries are supported by the GUI. For example, you cannot create a query in the GUI to return a list of properties for a user (e.g. name, email, pwdlastset).
- The GUI does not provide a way to cleanly export query results, whereas the web console can export your results into a CSV file.
BloodHound provides the means to investigate a target’s Active Directory data in ways that are specific and meaningful to you. Understanding the basics of how to use the Cypher query language will help you get the most out of the data.
Getting Started
The Cypher query language is not intuitive and can be quite daunting to de-cypher (haha). It surely was for me, but don’t let that stop you. It will make sense after spending a short amount of time with the data.
I recommend going over this short tutorial by Neo4j. It does an excellent job of breaking down the Cypher language through simple examples: https://neo4j.com/docs/getting-started/current/graphdb-concepts/
Nodes
Nodes in BloodHound represent Active Directory objects: Users, Groups, Computer, Ous, GPOs, and Domains.
Each Active Directory object is described by a node label and will look something like this
(:User)Queries are performed against node labels using the MATCH clause.
Node labels can be assigned to variables and later referenced in your query
(u:User)Take the basic example below. The MATCH clause is used to query the label “User,” assign the variable “u” to the User label, and return a limit of ten User nodes:
MATCH (u:User) return u LIMIT 10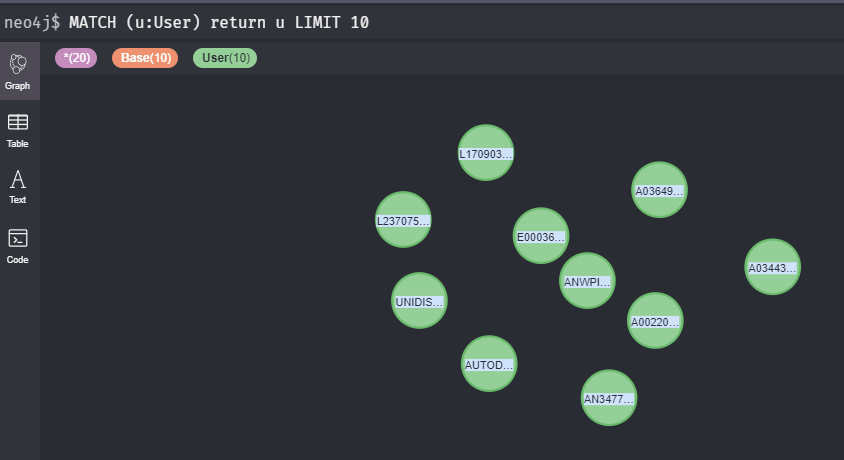
Setting a limit is highly recommended as it will save you time when you are experimenting with building queries.
Properties
Active Directory objects have properties associated with them. Things like name, description, email, lastlogontimestamp, etc. Object properties can be very interesting to a pentester by helping to gain a better understanding of the environment.
The query below searches for User nodes WHERE the property name CONTAINS the text “ADMIN,” and then returns the name, displayname, and description properties for any matches:
MATCH (u:User) WHERE u.name CONTAINS "ADMIN" return u.name, u.displayname, u.description LIMIT 10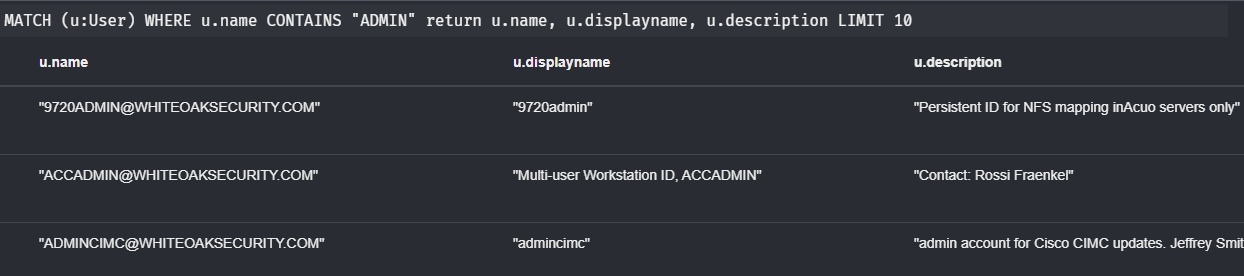
One of the drawbacks to the GUI is that it is limited in where it can search for keywords and in how it displays the results for your query. The above query will not return results in the GUI.
Functions
Cypher has the concept of functions that will take your queries to the next level! It is worth taking a look at the available functions to get a better idea of what you might be able to do with your data. However, there is a lot that you can do with only using a few.
One useful function is properties(). This function shows you all of the property types for a given node. Properties can be custom based on the target environment and are different between node type (user, group, etc.), so it’s a good idea to investigate the properties to gain a better understanding of the data and to check for any that may stand out:
MATCH (u:User) return properties(u) LIMIT 1
Another useful function is toUpper(). Queries in Cypher are case sensitive. Converting everything in your search to uppercase is a good way to deal with this issue. It’s especially helpful when searching for strings.
As an example, you can search for user descriptions that may contain passwords:
MATCH (u:User) WHERE toUpper(u.description) CONTAINS 'PASS' RETURN u.name,u.description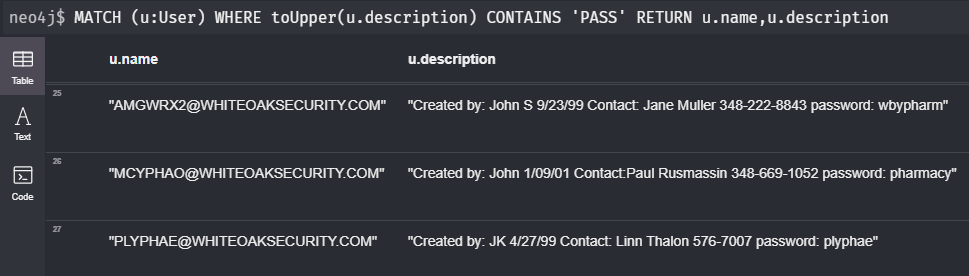
Regex
Cypher queries accept regular expressions.
The example below uses a case-insensitive regex to search for computers with outdated operating systems:
MATCH (c:Computer) WHERE c.operatingsystem =~ '.*(?i)(xp|2000).*' return c.name, c.operatingsystem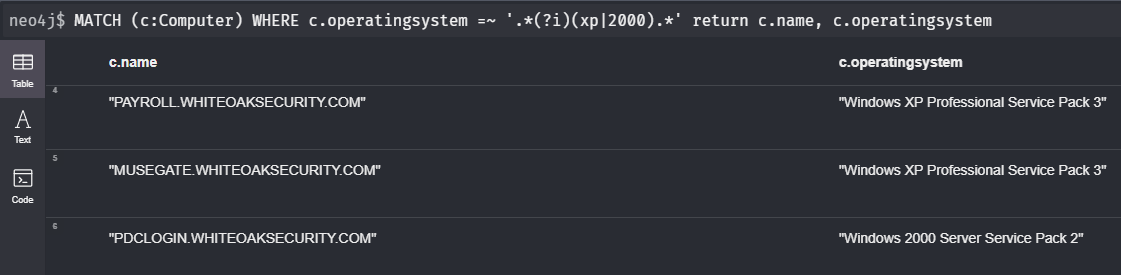
Edges/Relationships
Edges in BloodHound represent relationships between Active Directory objects (nodes). Edges will tell you a lot about the target’s environment such as the users in a specific group (MemberOf), or if a user has admin rights (AdminTo) to a computer.
Edges are represented in square brackets like this
[:MemberOf]The query below will show you all members of the Domain Admins group:
MATCH (u:User)-[:MemberOf]->(g:Group {name:'DOMAIN ADMINS@WHITEOAK.ORG'}) return u.name, u.displayname
Sweet Combos
With a basic understanding of the above concepts, you can put together some rather complex queries to ask interesting questions of your BloodHound data.
For example, it’s common for Domain Admin users to have both low and high privileged accounts, rather than using a Privileged Access Management system to temporarily elevate their privileges within the domain. This practice is something that can be taken advantage of on a pentest in cases where a Domain Admin uses the same password for their low and high privileged accounts.
In the query results above, you’ll notice that real names for Domain Admins are stored in the displayname property in the format of “aa_firstname lastname”. We can take advantage of this to identify multiple accounts belonging to the same user.
The query below will enumerate accounts in the Domain Admin group. For each account, the query will attempt to identify related accounts based on the last name that is stored in the displayname property using the split() and toUpper() functions:
MATCH (u:User)-[:MemberOf]->(g:Group {name:’DOMAIN ADMINS@WHITEOAKSECURITY.COM’}) WITH split(u.displayname, ' ')[1] AS name MATCH (u:User) WHERE toUpper(u.displayname) CONTAINS toUpper(name) RETURN u.name
Exporting Results
An important feature of the Neo4j console is that it allows you to export your query results into a CSV file. The catch is that you have to format the RETURN statement into a list of the specific items you want returned:
MATCH ... RETURN n.name, n.description, n.pwdlastsetThe query below will return a list of computers that BloodHound thinks a specific user has administrative access to. The list of computers can be exported to a CSV file as shown:
MATCH p=(m:User {name: "E9000310@WHITEOAKSECURITY.COM"})-[r1:MemberOf*1..]->(g:Group)-[r2:AdminTo]->(n:Computer) RETURN n.name
Closing
Consider spending a bit of time going through some of these examples with BloodHound data from a past assessment. I think that you will quickly find that the Cypher query language is not as complicated as it first appeared and that it can be of great use on future assessments.
More From White Oak Security
White Oak Security is a highly skilled and knowledgeable cyber security testing company that works hard to get into the minds of opponents to help protect those we serve from malicious threats through expertise, integrity, and passion.